Serfs Up 03 - Inventory UI
Building an Inventory in Unreal Part Two - Creating an Inventory UI
Creating an Inventory UI
In the last tutorial we setup the basics for an interactive world and inventory system. We created the interfaces, the container, the item actor and the necessary inputs and PlayerController but everything we did had little to no user feedback, which makes our game incredibly hard to play - unless you're going for an old school write everything down on notepaper kind of playstyle.
So in this tutorial we're going to walk through setting up a super awesome UI for SerfsUp.
Prelude - HUDs Up
To get our awesome UI up and running we need 3 main pieces
- A hud Interface class for the HUD running during our game (you may want to create other huds such as the game menu hud etc) so that we can call it to update
- A GameHUD class that loads up the GameHUDWidget
- A GameHUDWidget that contains all the widget items (while we can do this all in c++ I find this is the one time that using the visual interface will help more to explain and show the UI design)
Why do we need an interface for our GameHUD? Well, we don't really but it simplifies things a lot - first we don't need to deal with casting or checking the type of HUD. Second, it's much cleaner to route all the update calls through the world HUD class instead of binding tons of events in the HUD or updating everything on tick. The key to a performant UI is only updating the UI when we need to, ie. something has happened elsewhere in the game prompting a UI redraw.
Step 1 - GameHUDInterface
You probably know the drill by now, we're creating a new interface file
Public/Interfaces/GameHUDInterface.h// This work is licensed under a Creative Commons Attribution 4.0 International License https://creativecommons.org/licenses/by/4.0/
#pragma once
#include "CoreMinimal.h"
#include "UObject/Interface.h"
#include "SerfsUp/SerfsUpTypes.h"
#include "GameHUDInterface.generated.h"
// This class does not need to be modified.
UINTERFACE(MinimalAPI)
class UGameHUDInterface : public UInterface
{
GENERATED_BODY()
};
/**
*
*/
class SERFSUP_API IGameHUDInterface
{
GENERATED_BODY()
public:
/* HUD */
UFUNCTION(BlueprintNativeEvent, BlueprintCallable, Category = HUD)
void OpenHUD();
UFUNCTION(BlueprintNativeEvent, BlueprintCallable, Category = HUD)
void CloseHUD();
/* State */
// Returns whether the wider HUD is open
UFUNCTION(BlueprintNativeEvent, BlueprintCallable, Category = HUD)
bool HUDIsOpen();
// Returns whether the Inventory window specifically is open
UFUNCTION(BlueprintNativeEvent, BlueprintCallable, Category = HUD)
bool InventoryIsOpen();
/* Containers */
// Show the players inventory
UFUNCTION(BlueprintNativeEvent, BlueprintCallable, Category = HUD)
void OpenInventory();
/* Interactions */
// Called whenever an item is taken/picked up
UFUNCTION(BlueprintNativeEvent, BlueprintCallable, Category = HUD)
void OnItemTaken(FItem Item);
// Called whenever the Interactable Actor we're looking at changes
// Could be null (ie. not an interactable actor)
UFUNCTION(BlueprintNativeEvent, BlueprintCallable, Category = HUD)
void UpdateInteractable(AActor *Actor);
};Step 2 - WBP_GameHUD
Now comes the fun part, we've got to setup a super basic GameHUD UI Widget. Let's create a new User Interface/Widget Blueprint and call it
SerfsUp/Core/UserInteface/WBP_GameHUDFor now all we need to do in this file is to add the GameHUD interface.
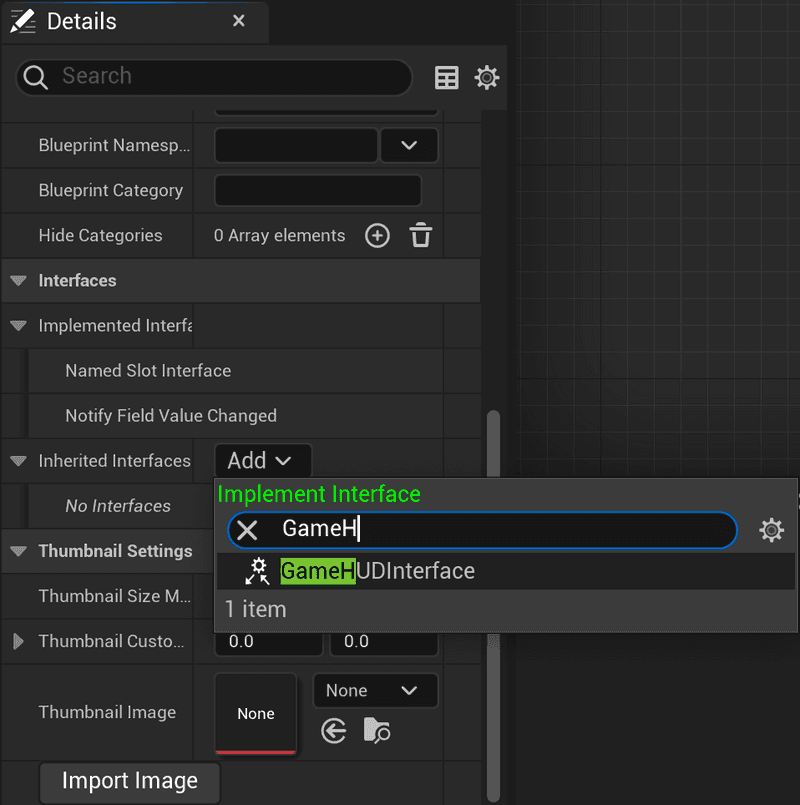
Reminder: Go into Graph, Class Settings and Add the GameHUDInterface to Inherited Interfaces.
We could easily just put all the widgets directly in the GameHUD but it's a better practice long term to decompose your UI down into components so let's start making the components we need for a full fledged UI.
We need two main components for this tutorial, an InteractableObject overlay and an Inventory screen to show the items we picked up.
WBP_Interactable
Let's create another WidgetBlueprint extending UserWidget called
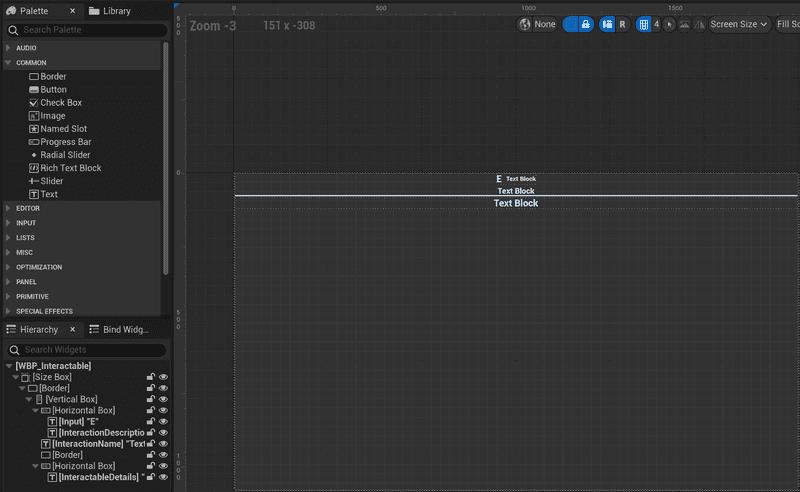
SerfsUp/Core/UserInteface/WBP_InteractableOnce open we need to drag in the following but you can arrange it or make it look any way you like. We're going to go with the following wrapping components
- A size box with width override 300 and height override 100
- A border inside the size box with Brush Color 0.1, 0.1, 0.1, 0.2 RGBA fill horiztonal and vertical
- A vertical box inside the border fill horiztonal and vertical
- A border inside the size box with Brush Color 0.1, 0.1, 0.1, 0.2 RGBA fill horiztonal and vertical
Inside of the wrapping components (ie the lower vertical box) we're going to setup our 3 text lines.
- A horizontal box center align horizontal, top align vertical
- A text widget we'll call "Input" and set Is Variable
- A text widget we'll call "InteractionDescription" and set Is Variable
- A text widget we'll name "InteractionName" and set Is Variable
- A border we'll make as a 0.1px divider
- A horizontal box center align horizontal, top align vertical
- A text widget we'll call "InteractionDetails" and set Is Variable
Once you're done you should have a widget that looks somewhat similar to
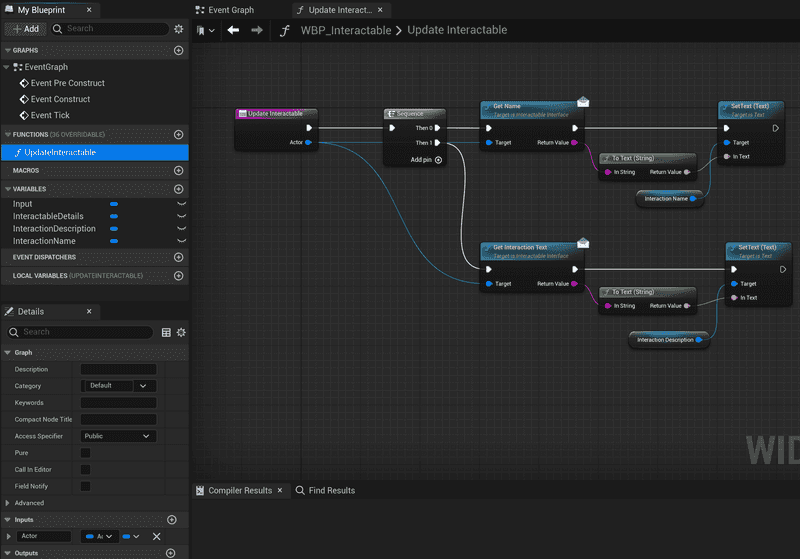
We will need some way for our WBP_GameHUD to update the text of this interactable widget. We could expose each variable directly and have the parent class set it but it's much easier to create an Update function that takes a pointer to an Actor and let the component handle the right updates.
Create a function called "UpdateInteractable" and give it one input variable, "Actor" of type Actor object reference.
We'll connect a simple sequence (I find it cleaner than chaining calls), the first will call GetName of InteractableInterface against the actor to get the Interactable name and SetText of InteractionName that we defined above to the string.
The second will do the same but getting the GetInteractionText and setting InteractionDescription instead.
Once done, saved and compiled your component should look like this.
WBP_Inventory
Let's create another WidgetBlueprint extending UserWidget called
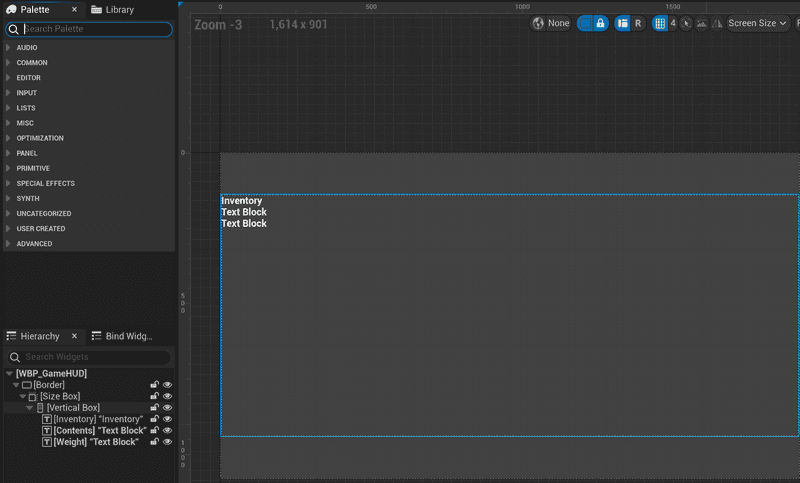
SerfsUp/Core/UserInteface/WBP_InventoryWe could create something really in depth and beautiful here but for the purpose of this tutorial it's more about the wiring and the structure than a deep dive into Lists and Interface design so we're going to have a UI that just prints a string of every item in your inventory separated by comma's. Super rough but it will show you everything working and let you tweak and design to your hearts content.
Let's start by creating a
- Border widget and setting it to right and bottom align and set the padding to 0.0, 100.0, 25.0, 50.0 and the appearance brush color to 0.01, 0.01, 0.01, 0.5 RGBA
- Inside the border we want a size box with min width 600, min height 800 with fill horizontally and center vertically
- Inside the size box we want a vertical box
- Inside the vertical box we want a Text widget with the string "Inventory"
- Inside the vertical box we want a Text widget named "Contents" and promote it to a variable
- Inside the vertical box we want a text widget named "Weight" and promote it to a variable.
- Inside the size box we want a vertical box
- Inside the border we want a size box with min width 600, min height 800 with fill horizontally and center vertically
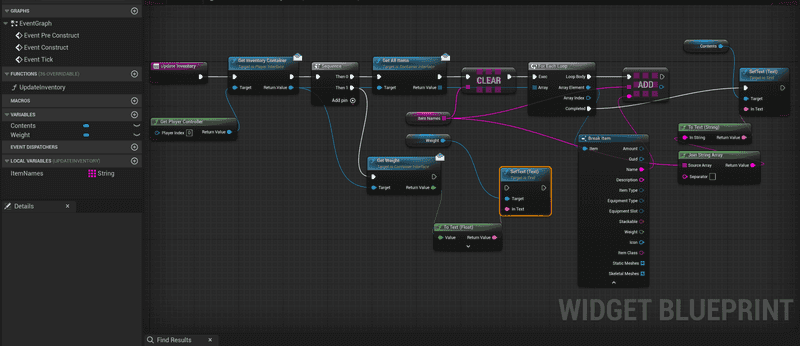
Similar to the interactable widget, we need a function to update the inventory so lets create a void function called UpdateInventory.
Inside of this function we need to create a Local Variable - ItemNames as a String array. Then we're going to create a sequence ot do two things
- Get the itemname from each of the items, add it to the ItemNames array and then set the Contents text to be the joined string of the names
- Get the weight and set the Weight text to be the weight
Putting it all together
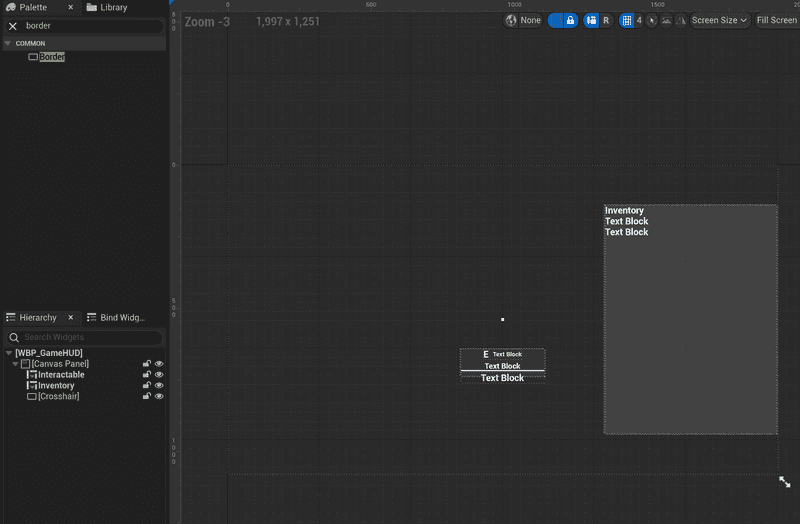
Back inside of your WBP_GameHUD we're going to add our components to the overall HUD. Let's start by adding a CanvasPanel to our WBP_GameHUD.
Inside of the CanvasPanel we're going to do something new and instead of adding base widgets, we're going to add our two components. If you search in the pallete for Interactable you should be able to add WBP_Interactable to your UI.
Drag the component in and rename it to "Interactable" (and feel free to position it where you want, I have it in the horiztonal center of the screen just below vertical center).
We'll do the same with WBP_Inventory, add it, rename it to "Inventory" and align it where you want.
Lastly, to make it easier to aim at things, let's add a tiny little crosshair in the center of the screen by adding a border, centering it in the screen, sizing it to 10x10 and set the alpha to 0.3.
You should end up with something like this.
Inside of the graph we want to add a few variables.
- boolean bIsHUDOpen
- boolean bIsInventoryOpen
- Actor object reference FocusedActor
Now we could just hook up all the code in the top level event graph for each of the HUD Interface functions but I find it cleaner to make internal functions instead so let's start adding the functions.
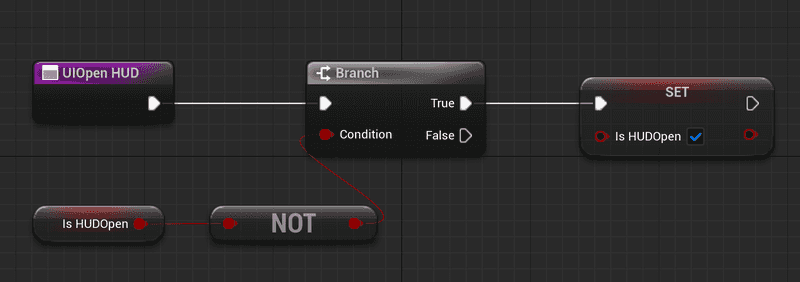
Let's create UIOpenHUD first, this one is simple, if bIsHUDOpen is false, set it to true
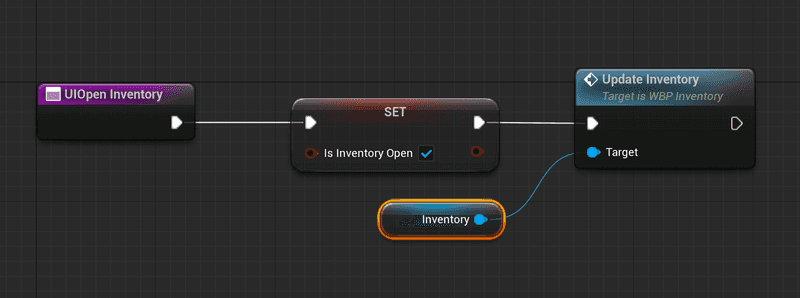
Next create UIOpenInventory and set bIsInventoryOpen to true and call UpdateInventory on our Inventory variable.
Next create UICloseHUD which should set bIsHUDOpen and bIsInventoryOpen both to false.
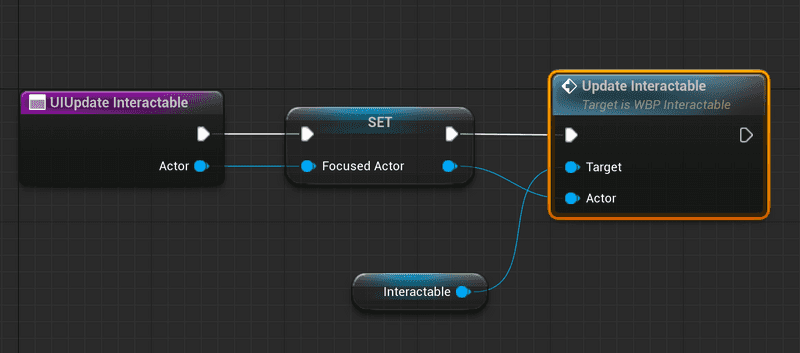
Next create, UIUpdateInteractable which should take an Actor object reference. This function sets FocusedActor to our input and then calls UpdateInteractable on our Interactable variable and passes in the actor.
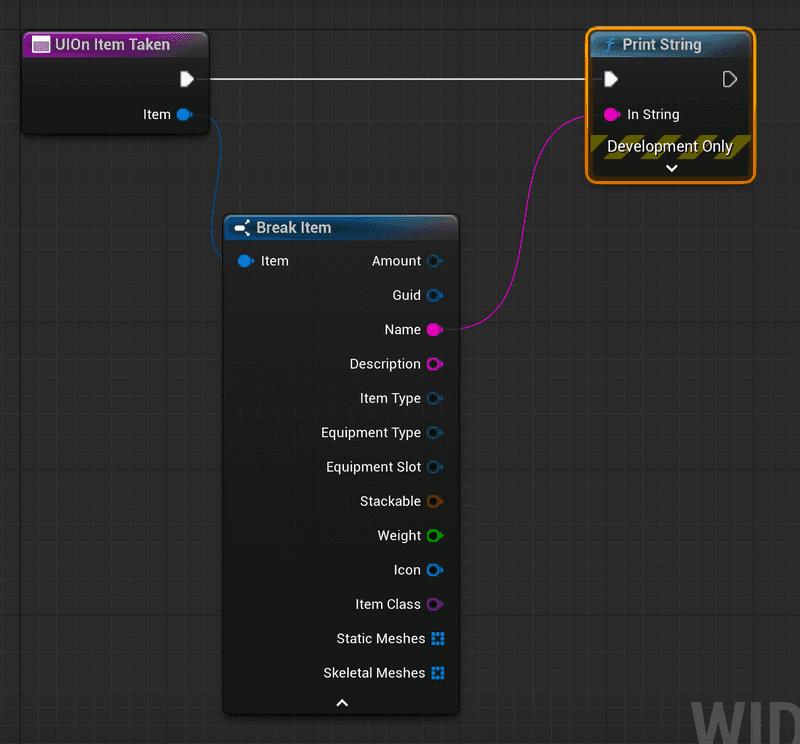
Last function to create, OnItemTaken which should take an Item struct. We could add a super nice little dynamic component that renders the item we picked up but for now in this tutorial let's just print the string to the game. You should know enough after we hook everything up to make something better yourself as homework :)
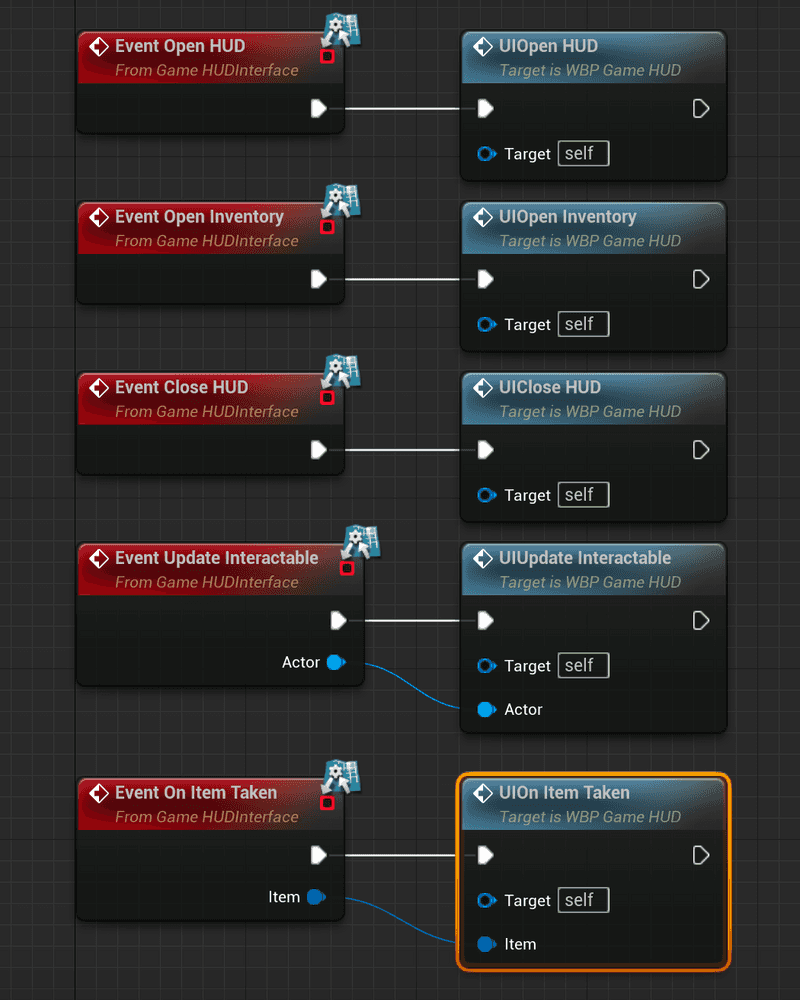
Now we need to stub the interface events, add each of OpenHUD, OpenInventory, CloseHUD, UpdateInteractable and OnItemTaken.
Each of them will create an event that we need to hook up to the corresponding UI function.
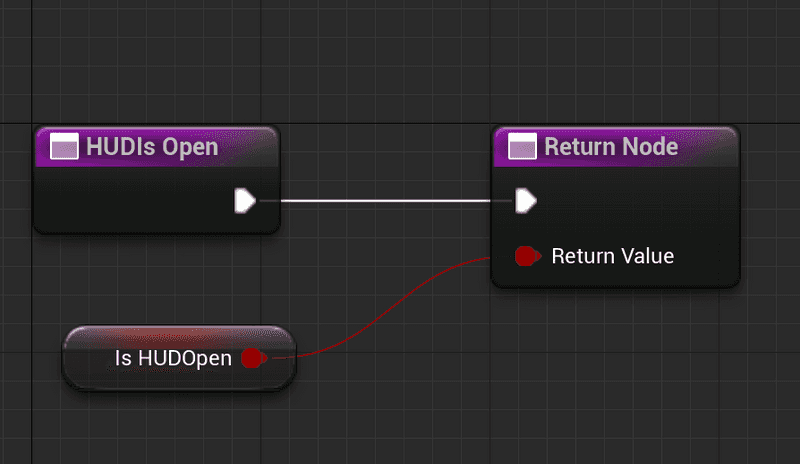
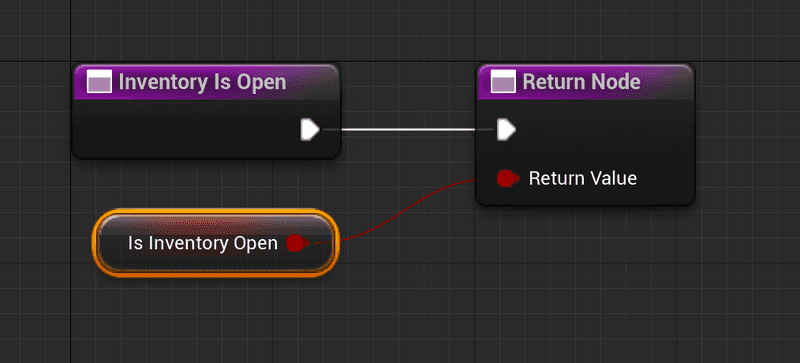
For the two Interface functions that return values they will create actual nested functions so if you double click on IsInventoryOpen and HUDIsOpen we can just directly return both boolean values.
Last step inside of GameHUD is to bind the visibility of our components to the state of the HUD. That means showing the inventory when bIsInventoryOpen is true and showing the Interactable component when FocusedActor is not null.
Jump back into the designer, click on Interactable and scroll down to visibility in the details panel. On the right hand side where it says Bind in a dropdown, press the dropdown and create a binding.
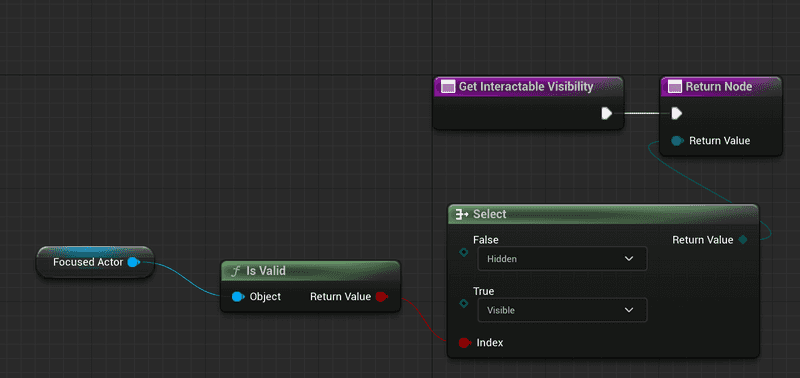
It will automaticaly create a function for us, Get_Interactable_Visibility. Inside this function we need to pass a select into the return node which checks if FocusedActor is valid. If it's valid, we should set the visibility to Visible otherwise Hidden.
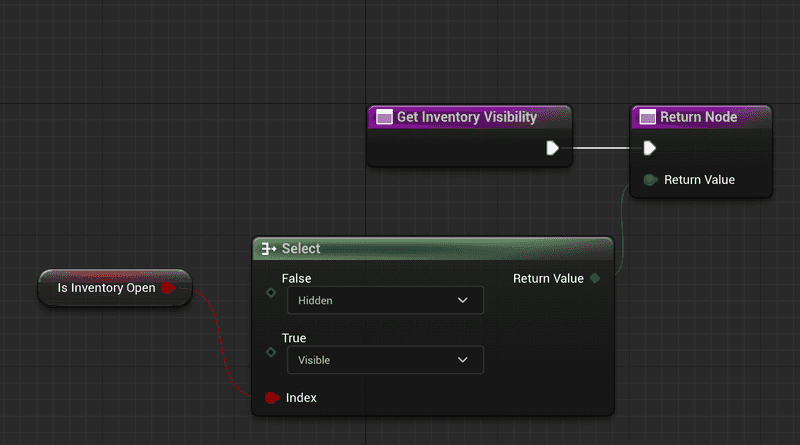
We do the same to our Inventory component. Inside this function we need to pass a select into the return node, set bIsInventoryOpen to the index and on false, set to Hidden and on true set to Visible like so
Step 3 - The GameHUD
Next up we'll create the GameHUD class. This will be the default HUD class for the game engine when we're playing the game and not on a menu. This class is effectively the owner and proxy for all the GameHUDInterface calls to the WBP_GameHUD.
First we need to add the UMG plugin to our C++ code by opening
SerfsUp.Build.csPublicDependencyModuleNames.AddRange(new string[] { "Core", "CoreUObject", "Engine", "InputCore", "HeadMountedDisplay", "EnhancedInput", "UMG" });Then let's create the GameHUD classes
Public/Game/GameHUD.h// This work is licensed under a Creative Commons Attribution 4.0 International License https://creativecommons.org/licenses/by/4.0/
#pragma once
#include "CoreMinimal.h"
#include "GameFramework/HUD.h"
#include "Blueprint/UserWidget.h"
#include "Interfaces/GameHUDInterface.h"
#include "GameHUD.generated.h"
/**
*
*/
UCLASS()
class SERFSUP_API AGameHUD : public AHUD, public IGameHUDInterface
{
GENERATED_BODY()
public:
AGameHUD();
protected:
// To add mapping context
virtual void BeginPlay();
public:
/* GameHUDInterface */
void OpenHUD_Implementation() override;
void CloseHUD_Implementation() override;
bool HUDIsOpen_Implementation() override;
bool InventoryIsOpen_Implementation() override;
void OpenInventory_Implementation() override;
void OnItemTaken_Implementation(FItem Item) override;
void UpdateInteractable_Implementation(AActor *Actor) override;
private:
/* Widget */
TSubclassOf<class UUserWidget> HUDWidgetClass;
UUserWidget *HUDWidget;
};Private/Game/GameHUD.cpp// This work is licensed under a Creative Commons Attribution 4.0 International License https://creativecommons.org/licenses/by/4.0/
#include "Game/GameHUD.h"
AGameHUD::AGameHUD()
{
ConstructorHelpers::FClassFinder<UUserWidget> WidgetClassFinder(TEXT("WidgetBlueprint'/Game/SerfsUp/Core/UserInterface/WBP_GameHUD'"));
if (WidgetClassFinder.Succeeded())
{
HUDWidgetClass = WidgetClassFinder.Class;
}
}
void AGameHUD::BeginPlay()
{
// Call the base class
Super::BeginPlay();
// Create our HUDWidget
HUDWidget = CreateWidget<UUserWidget>(PlayerOwner, HUDWidgetClass);
// Add it to the viewport to be rendered
HUDWidget->AddToViewport(0);
}
/*
* IGameHUDInterface
*/
void AGameHUD::OpenHUD_Implementation()
{
IGameHUDInterface::Execute_OpenHUD(HUDWidget);
}
void AGameHUD::CloseHUD_Implementation()
{
IGameHUDInterface::Execute_CloseHUD(HUDWidget);
}
bool AGameHUD::HUDIsOpen_Implementation()
{
if (HUDWidget->Implements<UGameHUDInterface>())
{
return IGameHUDInterface::Execute_HUDIsOpen(HUDWidget);
}
return false;
}
bool AGameHUD::InventoryIsOpen_Implementation()
{
if (HUDWidget->Implements<UGameHUDInterface>())
{
return IGameHUDInterface::Execute_InventoryIsOpen(HUDWidget);
}
return false;
}
void AGameHUD::OpenInventory_Implementation()
{
IGameHUDInterface::Execute_OpenInventory(HUDWidget);
}
void AGameHUD::OnItemTaken_Implementation(FItem Item)
{
IGameHUDInterface::Execute_OnItemTaken(HUDWidget, Item);
}
void AGameHUD::UpdateInteractable_Implementation(AActor *Actor)
{
IGameHUDInterface::Execute_UpdateInteractable(HUDWidget, Actor);
}Step 4 - Set our HUD as the default for our game
To make sure our HUD loads as default for our GameMode, open
Private/Game/SerfsUpGameMode.cpp// This work is licensed under a Creative Commons Attribution 4.0 International License https://creativecommons.org/licenses/by/4.0/
#include "Game/GameHUD.h"
ASerfsUpGameMode::ASerfsUpGameMode()
{
...
// Setup the HUD
HUDClass = AGameHUD::StaticClass();
}Interlude
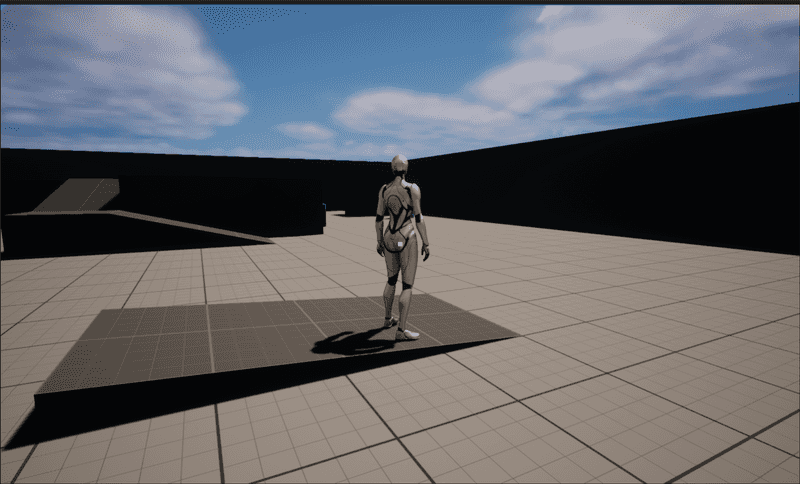
Nothing will work yet since we haven't connected our HUD to our GameEvents but it's a good time to test that everything compiles and loads properly. At the very least, loading into our game now we should see our crosshair which will let us know that everything is working as expected.
And there it is, right in the center of the screen.
Connecting all the HUD pieces
We need to add a few more things to pipe all the pieces together. Since we covered a lot of this in the last Tutorial, we're going to skim over this part but feel free to refer to the previous tutorial.
- Add IA_Inventory Input Action
- Add IA_Inventory to IMC_Character and bind to keypress I
- Create an InventoryAction in PlayerController and bind the input
- Bind a function in PlayerController to InventoryContainer->OnItemAdded and InteractionComp->OnInteractableActorChanged
- Add all the calls to the HUD to update the UI
SerfsUpPlayerController.h// This work is licensed under a Creative Commons Attribution 4.0 International License https://creativecommons.org/licenses/by/4.0/
public:
/** Inventory Input Action */
UPROPERTY(EditAnywhere, BlueprintReadOnly, Category = Input, meta = (AllowPrivateAccess = "true"))
class UInputAction *InventoryAction;
protected:
/** Called for Inventory input*/
void OnInventoryAction(const FInputActionValue &Value);
protected:
/* Bindings */
UFUNCTION()
void OnItemTaken(FItem Item);
UFUNCTION()
void OnInteractableActorChanged(AActor *Actor);SerfsUpPlayerController.cpp// This work is licensed under a Creative Commons Attribution 4.0 International License https://creativecommons.org/licenses/by/4.0/
#include "GameFramework/HUD.h"
#include "Interfaces/GameHUDInterface.h"
void ASerfsUpPlayerController::BeginPlay()
{
...
// Bindings
if (InventoryContainer)
{
InventoryContainer->OnItemAdded.AddDynamic(this, &ASerfsUpPlayerController::OnItemTaken);
}
if (InteractionComp)
{
InteractionComp->OnInteractableActorChanged.AddDynamic(this, &ASerfsUpPlayerController::OnInteractableActorChanged);
}
}
void ASerfsUpPlayerController::SetupInputComponent()
{
Super::SetupInputComponent();
// Set up action bindings
if (UEnhancedInputComponent *EnhancedInputComponent = CastChecked<UEnhancedInputComponent>(InputComponent))
{
// Bind interaction start and end to two local functions that we can proxy through to the Interaction Component
EnhancedInputComponent->BindAction(InteractAction, ETriggerEvent::Triggered, this, &ASerfsUpPlayerController::OnInteractActionStart);
EnhancedInputComponent->BindAction(InteractAction, ETriggerEvent::Completed, this, &ASerfsUpPlayerController::OnInteractActionEnd);
// Bind Inventory to a local function
EnhancedInputComponent->BindAction(InventoryAction, ETriggerEvent::Completed, this, &ASerfsUpPlayerController::OnInventoryAction);
}
}
void ASerfsUpPlayerController::OnInventoryAction(const FInputActionValue &Value)
{
AHUD *GameHUD = GetHUD();
if (GameHUD && GameHUD->Implements<UGameHUDInterface>())
{
bool bIsHUDOpen = IGameHUDInterface::Execute_HUDIsOpen(GameHUD);
bool bIsInventoryOpen = IGameHUDInterface::Execute_InventoryIsOpen(GameHUD);
if (bIsHUDOpen)
{
// HUD is already open so close the HUD
IGameHUDInterface::Execute_CloseHUD(GameHUD);
// If inventory was already open return with the hud closed
if (bIsInventoryOpen)
{
return;
}
}
// Open the Inventory
IGameHUDInterface::Execute_OpenHUD(GameHUD);
IGameHUDInterface::Execute_OpenInventory(GameHUD);
}
}
/* Bindings */
void ASerfsUpPlayerController::OnItemTaken(FItem Item)
{
AHUD *GameHUD = GetHUD();
IGameHUDInterface::Execute_OnItemTaken(GameHUD, Item);
}
void ASerfsUpPlayerController::OnInteractableActorChanged(AActor *Actor)
{
AHUD *GameHUD = GetHUD();
IGameHUDInterface::Execute_UpdateInteractable(GameHUD, Actor);
}Fin
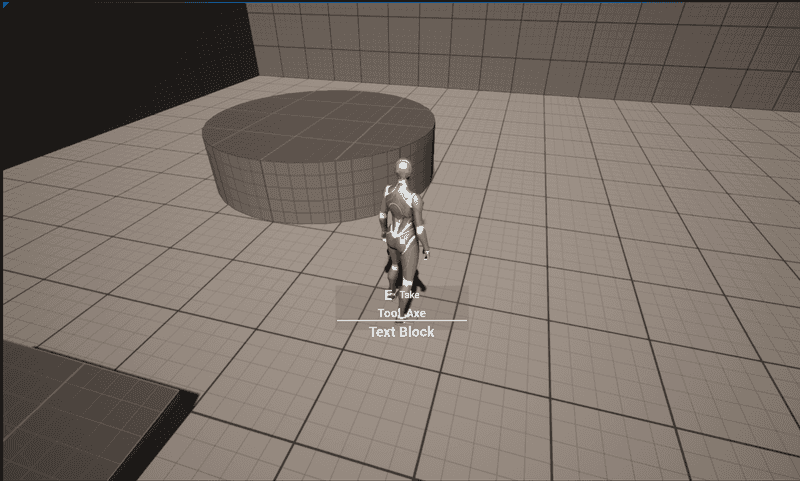
If you play the game now and you've followed along closely you'll now see your UI start to update as you look at items in the world. If we put the cursor over the axe you'll see the interactable window appear with the item details.
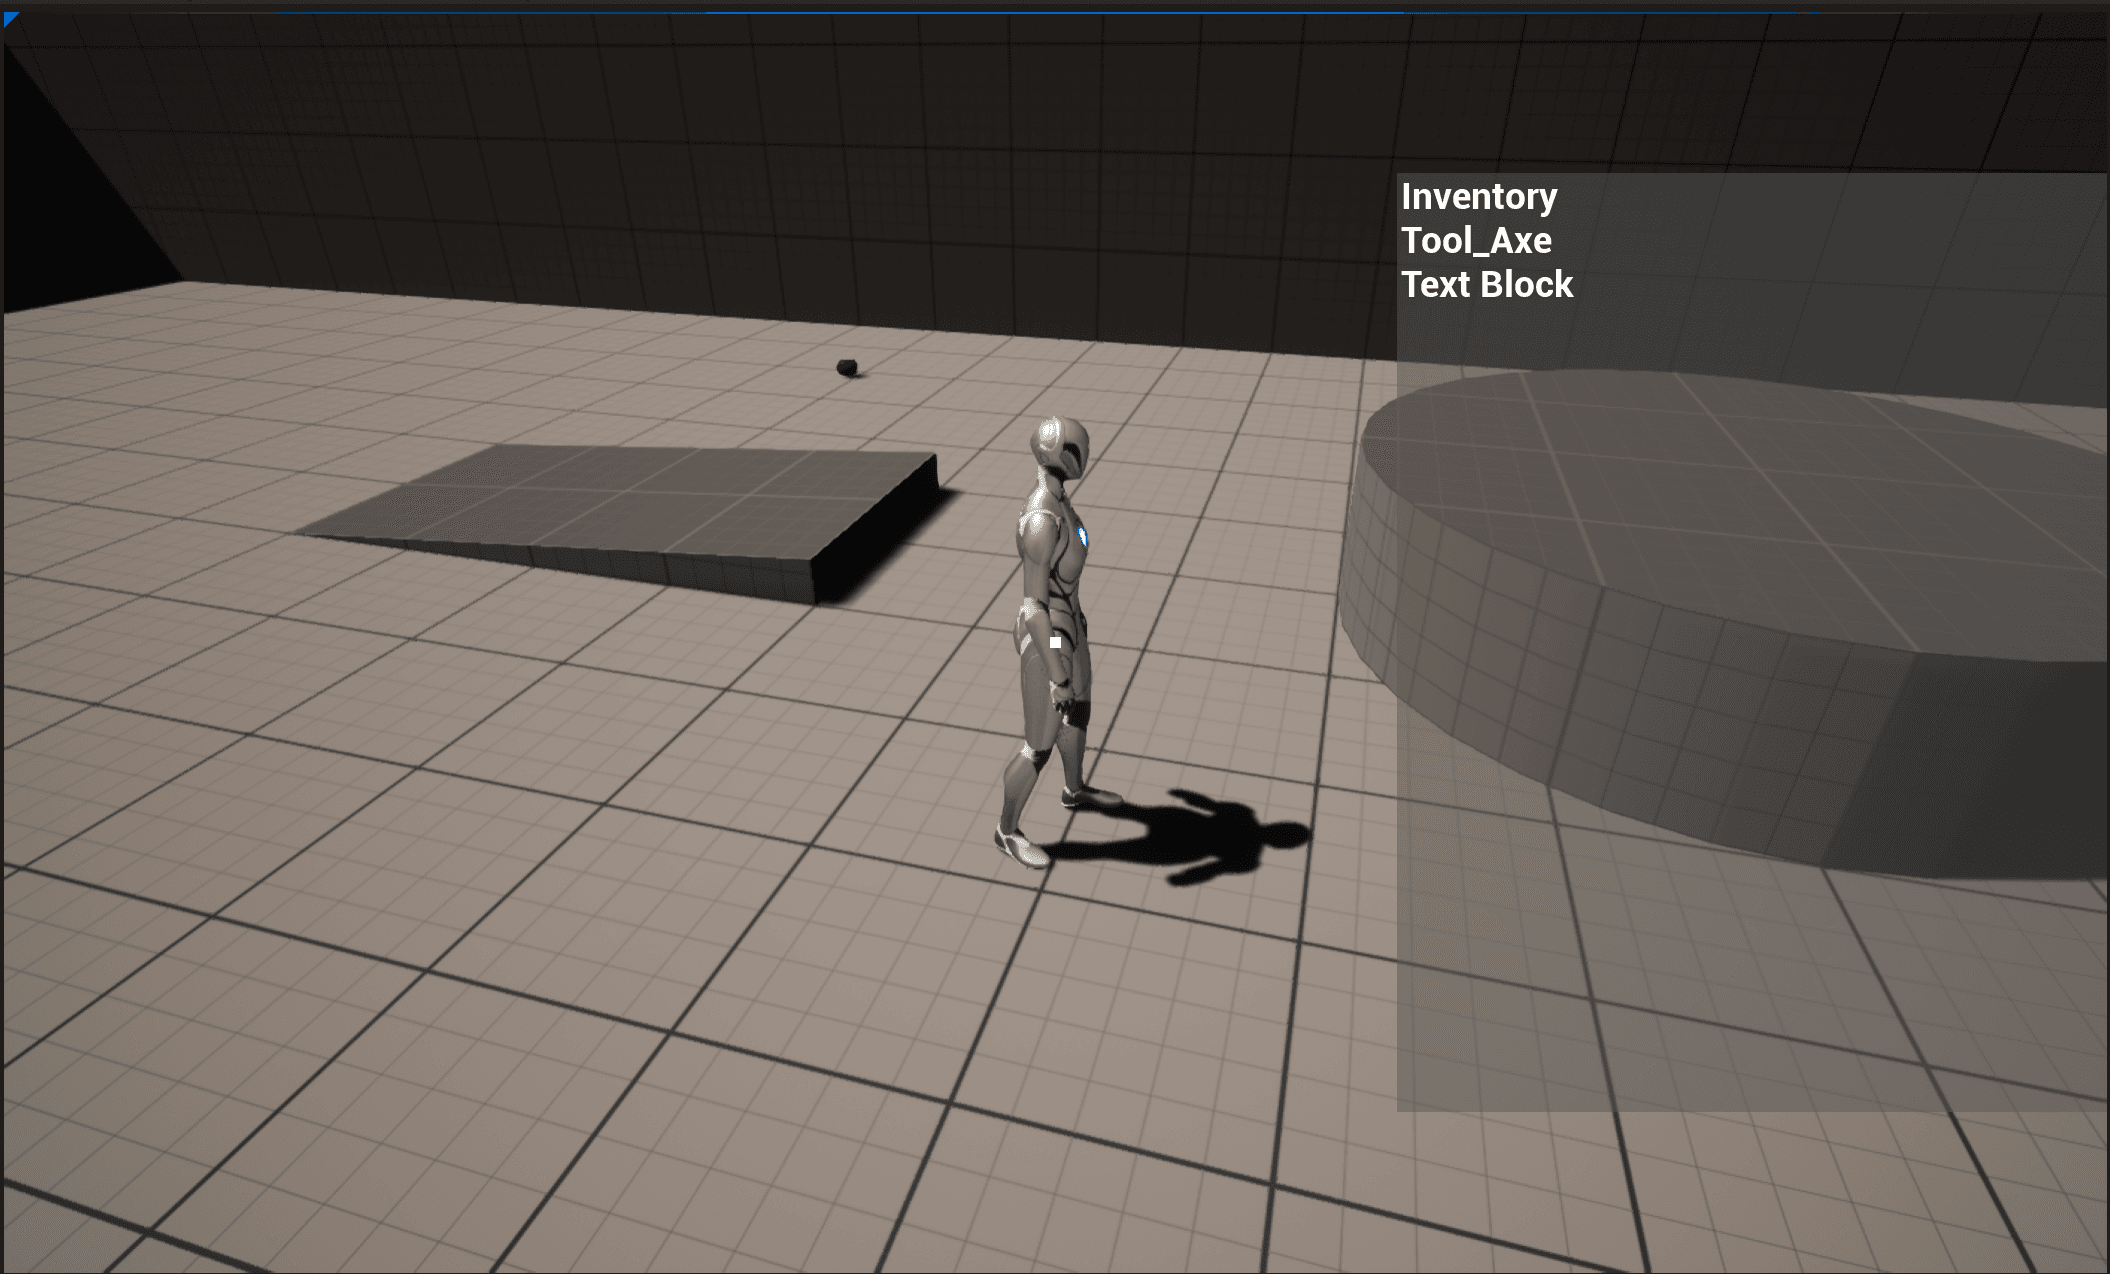
If we hit E we'll take the axe and see "Tool_Axe" log to the screen and if we open our inventory we'll now see
Pretty incredible, those are all the building blocks you need to extend and work with an Inventory system, Interaction system and a UI.

